React components 简介
React每一个组件都可以作为用户界面上的一个独立单元,所见即所得,你在组件里面写啥浏览器就会呈现啥效果。为了能够运行不报错,每个组件必须返回至少一个UI元素。
创建React组件的方式有两种,通过JavaScript class 和 function语法来实现。下面通过 class 来定义组件
1
2
3
4
5
6
7
|
import React from 'react';

class MainComponent extends React.Component {
  render(){
    return <h1> Hello, World!</h1>
  }
}
|
class 组件必须总是包含 render() 函数并且有return否则会报错。
下面是如何通过定义一个function component
1
2
3
4
5
|
import React from 'react';

function MainComponent(){
  return <h1>Hello World</h1>
}
|
跟class component一样,function component必须通过return返回,但是你不必给它创建render()函数。
如果你的组件不想返回任何东西,可以返回 null 或者 false
 1
 2
 3
 4
 5
 6
 7
 8
 9
10
11
|
import React from 'react';

function MainComponent(){
  return null
}

class MainComponent extends React.Component {
  render(){
    return false
  }
}
|
因为React本质上就是一个JavaScript库,所有的组件代码可以保存在.js为扩展的文件中。你可能在其他开源项目中见到过.jsx扩展,大多数编译器对这两种扩展文件同等看待,所以用.js也挺好。
返回多个元素
默认情况下一个组件必须总是返回单一元素。当你想要返回多个元素,这时候就需要将这些元素包裹起来,比如使用<div>
 1
 2
 3
 4
 5
 6
 7
 8
 9
10
11
12
|
import React from 'react';

class MainComponent extends React.Component {
  render(){
    return (
    	<div>
      	<h1>Hello World!</h1>
        <h2>Learning to code with React</h2>
      </div>
    )
  }
}
|
这样会使得前端多渲染一层额外的<div>标签,如果你有强迫症的话,你可以使用空tag
 1
 2
 3
 4
 5
 6
 7
 8
 9
10
11
12
|
import React from 'react';

class MainComponent extends React.Component {
  render(){
    return (
    	<>
      	<h1>Hello World!</h1>
        <h2>Learning to code with React</h2>
      <>
    )
  }
}
|
这样就不会在浏览器端渲染额外的标签了,这个方法在函数组件中同样适用。
渲染到页面
组件创建了之后并不能直接渲染到屏幕上,还需要使用ReactDOM.render()函数,它接收两个参数:
- 你想要渲染的组件
- 渲染需要的HTML元素
也就是说你需要在React项目中创建一个HTML文件,否则React无处渲染组件。通常来说,一个最基本的HTML文件仅需要一个div就够了
接下来将组件渲染到这个div中,这个操作需要从react-dom包中导入ReactDOM
 1
 2
 3
 4
 5
 6
 7
 8
 9
10
11
12
13
|
import React from 'react';
import ReactDOM from "react-dom";

class MainComponent extends React.Component {
  render(){
    return <h1>Hello World!</h1>
  }
}

ReactDOM.render(
	<MainComponent />,
  document.querySelector("#root")
)
|
演示代码 a render in Code Sandbox
注释书写
在React组件中写注释跟你在传统的JavaScript代码中写的方式没有差别,你可以使用//来注释任何代码
1
2
3
4
5
6
7
|
class MainComponent extends React.Component {
  render(){
    // const name = "xiaoming"
    // const age = 18
    return <h1>Hello World!</h1>
  }
}
|
同样可以使用/* */
1
2
3
4
5
6
7
8
9
|
class MainComponent extends React.Component {
  render(){
    /*
    const name = "xiaoming"
    const age = 18
    */
    return <h1>Hello World!</h1>
  }
}
|
通常来说/* */注释方式用来注释license或者开发文档
1
2
3
4
5
6
7
8
|
/** @license React v17.0.1
 * react.development.js
 *
 * Copyright (c) Facebook, Inc. and its affiliates.
 *
 * This source code is licensed under the MIT license found in the
 * LICENSE file in the root directory of this source tree.
 */
|
不过这个没有硬性规定,所以可以根据喜好使用。
第一个实例
官方提供了创建React项目的命令行工具,能够方便我们快速的开启项目。这个工具是Create React App
1
|
npx create-react-app myapp
|
创建项目之后进入并运行
这样就能看到官方的React模板试例,当前的项目目录是
1
2
3
4
5
6
7
|
.
├── README.md
├── node_modules
├── package.json
├── public
├── src
└── yarn.lock
|
其中src/目录存放React组件的源代码,打开App.js可以看到这个组件被index.js文件引用。
我们可以先不动别的,把Edit <code>src/App.js</code> and save to reload.这一行改为Hello World!,删除 Learn React这一行的a标签。
修改完之后我们可以从浏览器中立刻看到结果,就是我们修改之后的Hello World!
JSX: React模板语言
通过前面我们了解到,一个组件必须返回一些内容:
1
2
3
4
5
|
class MainComponent extends React.Component {
  render(){
    return <h1>Hello World!</h1>
  }
}
|
这里的标签<h1>看起来很像标准的HTML标签,但事实上它是React中特殊的模板语言,称为JSX。
JSX是JavaScript的扩展,它使得能够在React元素中使用JS,可以赋值给变量,可以作为函数的返回值,比如:
1
2
3
4
5
6
|
class MainComponent extends React.Component {
  render(){
    const element = <h1>Hello World!</h1>
    return element
  }
}
|
JSX中可以加入样式class,但是需要使用额外的名称className
1
|
const App = <h1 className='text-lowercase'>Hello World</h1>
|
JSX中的注释方式有些特别,你可能之前接触过HTML语言,它里面使用<!-- -->语法来注释,但是在React中这样写会报Unexpected token
1
2
3
4
5
6
7
8
9
|
export default function App(){
  return (
  <div>
    <h1>Hello World</h1>
      	<!-- <p>My name is xiaoming</p> -->
     <p>Nice to meet you!</p>
   </div>
  )
}
|
正确的方式使使用{/* comment */}
1
2
3
4
5
6
7
8
9
|
export default function App(){
  return (
  <div>
    <h1>Hello World</h1>
      {/* <p>My name is xiaoming</p> */}
     <p>Nice to meet you!</p>
   </div>
  )
}
|
多行注释
1
2
3
4
5
6
7
8
9
|
export default function App(){
  return (
  <div>
    {/* <h1>Commenting in React and JSX</h1>
      <p>My name is xiaoming</p>
      <p>Nice to meet you!</p> */}
   </div>
  )
}
|
小技巧:最新的IDE一般都会带有注释的快捷键,比如VSCode中使用CTRL+/ command+/(macOS)就可以自动实现注释
JSX中使用JavaScript
JSX中使用{}来包含JavaScript语法:
1
2
3
|
const lowercaseClass = 'text-lowercase';
const text = 'Hello World!';
const App = <h1 className={lowercaseClass}>{text}</h1>;
|
这便是React元素与HTML的不同之处,你在真正的HTML中没法通过{}来直接引用JavaScript。
这样做的好处就是,我们不需要再学习一套新的模板语法,而是直接使用JavaScript函数来控制模板的显示输出。
比如说我们有一个用户的数组需要显示:
1
2
3
4
5
|
const users = [
  { id: 1, name: 'Xiaoming', role: 'Web Developer' },
  { id: 2, name: 'Xiaohong', role: 'Web Designer' },
  { id: 3, name: 'Xiaowang', role: 'Team Leader' },
]
|
我们可以使用map()函数来遍历数组
 1
 2
 3
 4
 5
 6
 7
 8
 9
10
11
12
13
14
15
16
17
18
19
20
21
22
23
|
import React from "react"

function App() {

const users = [
  { id: 1, name: 'Xiaoming', role: 'Web Developer' },
  { id: 2, name: 'Xiaohong', role: 'Web Designer' },
  { id: 3, name: 'Xiaowang', role: 'Team Leader' },
]

return (
    <>
    <p>The currently active users list:</p>
    <ul>
      {
        users.map(function(user){
          return ( <li> {user.name} as the {user.role} </li>)
        })
      }
    </ul>
    </>
  )
}
|
上面的例子会遍历users中的所有元素,生成对应的<li>,以HTML列表的形式显示在浏览器中。
还需要注意的一点是,上述方法还会报一个警告,说每一个子列需要"key"参数。这个key在React中有特殊的作用,它用于唯一操作列表中子元素的增删改查。
推荐使用你数据中的独一无二的标识来作为key值。比如上面的例子,id就可以作为这个唯一值:
1
2
3
4
5
6
7
|
return (

<li key={user.id}>
    {user.name} as the {user.role}
</li>

)
|
要是实在找不到独一无二的key,也可以使用数组的下标:
1
2
3
4
5
6
7
8
9
|
{
users.map(function(user, index){
  return (
      <li key={index}>
        {user.name} as the {user.role}
      </li>
    )
})
}
|
但是最好不要这么做,可能会出现未知的BUG
组件组合
目前为止,我们只写了一些单一组件。真实的项目中,应用是由成百上千个组件组合而成的。这个过程就根拼积木一样,我们看下面的例子:
 1
 2
 3
 4
 5
 6
 7
 8
 9
10
11
12
13
14
15
16
17
18
19
20
21
22
23
24
25
26
27
28
29
|
class ParentComponent extends React.Component {
  render(){
    return (
    	<>
      	<UserComponent />
      	<ProfileComponent />
      	<FeedComponent />
      <>
    )
  }
}

class UserComponent extends React.Component {
  render() {
    return <h1> User Component</h1>
  }
}

class ProfileComponent extends React.Component {
  render() {
    return <h1> Profile Component</h1>
  }
}

class FeedComponent extends React.Component {
  render() {
    return <h1> Feed Component</h1>
  }
}
|
上面的例子中,<ParentComponent>同时渲染了三个子组件。无论是类组件还是函数组件都可以使用这种组合渲染方式,甚至可以混合使用,比如类组件包含函数组件,函数组件包含类组件。
自定义函数
组件中可以自定函数,并且不需要以function开头:
 1
 2
 3
 4
 5
 6
 7
 8
 9
10
11
12
13
14
15
16
17
18
|
import React from 'react';

class MainComponent extends React.Component {
  formatName(firstName, lastName){
    return firstName + ' ' + lastName;
  }

  render(){
    const firstName = "Bruce"
    const lastName = "The Batman"
    return (
    	<>
      	<h1>Hello World!</h1>
      	<h2>I'm {this.formatName(firstName, lastName)}</h2>
      </>
    )
  }
}
|
上面的例子定义了函数formatName并且在render函数中调用了。值得注意的是这里使用了this.formatName,这个this指代拥有函数的类MainComponent
React 类组件会经常用带this关键字来访问类所有的属性。
state 和 props
在React中,props 和 states 都属于变量。其中Props(properties)通常用于从父组件传递数据到子组件,而states则是在组件本身中定义和使用。
比如说有如下的调用:
1
2
3
4
5
|
class ParentComponent extends React.Component {
  render(){
      return <ChildComponent name="Batman" />
  }
}
|
这里我们将包含值Batman变量name传递给了子组件,在子组件中这个变量会被接收到自己的this.props对象中,子组件中可以这么调用:
1
2
3
4
5
|
class ChildComponent extends React.Component {
  render() {
    return <p>Hello World! my name is {this.props.name}</p>
  }
}
|
传递多个props
你可以向子组件传递任意多个props:
 1
 2
 3
 4
 5
 6
 7
 8
 9
10
11
12
13
|
class ParentComponent extends React.Component {
  render(){
      return (
      	<ChildComponent
           name="Batman",
           Age={54},
           isMale={true},
           hobbies={["read books", "drink coffee"]},
           occupation="Rich Man"
          />
      );
  }
}
|
子组件中使用跟上面一样,都保存在了this.props中,这里还需要注意的一点是:传递的参数无论是字符串、数字、还是JavaScript表达式都需要包含在{}中,这是由于这里使用到的是JSX语法。
Props 不可变
prop的值无论何时都不能改变,比如下面的例子中显示的是传入的值,而不是Mark
1
2
3
4
5
6
|
class ChildComponent extends React.Component {
  render(){
    this.props.name = "Mark";
    return <p>Hello World! my name is {this.props.name}</p>
  }
}
|
如果你需要能够改变的变量,这时候就需要用到state了。你可以任意定义states数据,但是它需要在组件中被初始化和管理
1
2
3
4
5
|
class ParentComponent extends React.Component {
  state = {
    name: "John"
  }
}
|
这个变量可以使用this.state对象来获取,state变量需要注意的是不能直接通过赋值来改变,虽然下面的例子能够运行,但是是不标准的:
 1
 2
 3
 4
 5
 6
 7
 8
 9
10
|
class ParentComponent extends React.Component {
  state = {
    name: "John"
  }

	render(){
    this.state.name = "Bob"
    return <div>{this.state.name}</div>;
  }
}
|
推荐的方式是使用setState函数,它继承自React Component类。为了改变变量,我们需要传入一个跟定义时候类似的对象:
 1
 2
 3
 4
 5
 6
 7
 8
 9
10
11
12
|
class ParentComponent extends React.Component {
  state = {
    name: ""
  }

	render(){
    if (this.state.name === ""){
      this.setState({name: "Mark"});
    }
    return <div>{this.state.name}</div>;
  };
}
|
注意,永远不要不加条件的直接调用setState方法,它会导致无线循环,如下代码报错:
 1
 2
 3
 4
 5
 6
 7
 8
 9
10
|
class ParentComponent extends React.Component {
  state = {
    name: ""
  }

	render(){
    this.setState({name: "Mark"});
    return <div>{this.state.name}</div>;
  }
}
|
1
2
3
4
|
Error
Maximum update depth exceeded.
This can happen when a component repeatedly calls setState inside componentWillUpdate or componentDidUpdate.
React limits the number of nested updates to prevent infinite loops.
|
绑定自定义函数
定义了state之后,你可以将它传递到任意子组件当中,但是如果你想要在子组件中改变这个state的状态,这时候你就需要自定义函数并且将它传递到子组件。
 1
 2
 3
 4
 5
 6
 7
 8
 9
10
11
12
13
14
15
16
17
18
|
class ParentComponent extends React.Component {
  state = {
    name: "Joho"
  }

	setName(name){
    this.setState({name: name});
  }

	render(){
    return (
    	<ChildComponent
        name={this.state.name}
        setName={this.setName.bind(this)}
       />
    );
  }
}
|
这里需要注意的是bind这个关键字,当你向其他组件传递函数的时候,这个函数被调用的时候会使用到ChildComponent的上下文,而不再是ParentComponent
所以我们需要给他传递this,绑定到父组件的上下文。
这样我们可以通过在子组件中调用setName方法来改变变量:
 1
 2
 3
 4
 5
 6
 7
 8
 9
10
|
class ChildComponent extends React.Component {
  render(){
    return (
    <>
      <p> Hello Wrodl! my name is {this.props.name}</p>
      <button onClick={()=>this.props.setName("Mark")}> Change name</button>
    </>
    );
  }
}
|
React 事件处理
React内置了事件处理系统,比如之前用到的当点击button按钮触发的onClick
 1
 2
 3
 4
 5
 6
 7
 8
 9
10
11
12
13
|
class LogButton extends React.Component {
  handleClick = (event) => {
    console.log("Hello World!");
    console.log(event);
  };
  render(){
    return (
    	<button onClick={this.handleClick}>
        Click me
      </button>
    );
  }
}
|
当你点击按钮,console会显示 event变量的内容
1
2
|
Hello World!
SyntheticBaseEvent {_reactName: "onClick", _targetInst: null, type: "click", nativeEvent: MouseEvent, target: HTMLButtonElement…}
|
传入handleClick函数的event参数是React 自己的 Synthetic event。它是对浏览器native DOM events的封装,这样使事件能够被不同浏览器支持。
通过onChange事件保存用户输入
比如我们想要创建表单,这时候就需要onChange事件来追踪输入的数据
1
2
3
4
5
6
7
8
9
|
import React from "react";

class App extends React.Component {
  render(){
    return (
    	<input type="text" name="firstName" onChange={(event) => console.log("onchange is triggered!")} />
    )
  }
}
|
这样无论你向input输入什么,它都会触发onChange中的函数。
在HTML中的表单元素,比如<input>、<textarea>,保存着自己的变量
1
|
<input id="name" type="text">
|
我们可以使用document选择器来取到它的值
1
|
var name = document.getElementById("name").value;
|
在React里面,推荐将input值保存到state对象中。这样我们能够随后在React组件中处理表单输入的值:
 1
 2
 3
 4
 5
 6
 7
 8
 9
10
11
12
13
14
15
16
17
|
import React from "react";

class App extends React.Component {
  state = {
    name: ""
  }
    render(){
    return (
      <input
      type="text"
      name="firstName"
      onChange={(event) => this.setState({name: event.target.value})}
      value={this.state.name}
      />
    )
  }
}
|
阻止默认事件行为
由于React Synthetic 事件仅仅是封装,DOM对象的默认行为还是会被执行,就会出现一些额外的行为。
比如说表单提交按钮总是会在提交数据到后端的时候刷新浏览器。这会导致你定义在onSubmit事件中的函数被浏览器忽略:
 1
 2
 3
 4
 5
 6
 7
 8
 9
10
11
12
13
14
15
16
17
18
19
20
21
22
23
24
25
26
27
28
|
import React from "react";

class App extends React.Component {
  state = {
    name: ""
  }
handleSubmit(event) {
    console.log(this.state.name);
  }

	render(){
    return (
    	<form onSubmit={this.handleSubmit.bind(this)}>
        <label>
          Name:
          <input
            type="text"
            value={this.state.name}
            onChange={
              (event) => this.setState({name: event.target.value})
            }
          />
        </label>
        <input type="submit" value="Submit" />
      </form>
    );
  }
}
|
由于DOM的默认行为,handleSubmit会被忽略,log语句无法打印到控制台。现代web程序很多会有前端验证逻辑,这种行为会使这些验证失效。所以我们需要修改这些默认行为。
取消这种行为,可以使用event.preventDefault()
1
2
3
4
|
handleSubmit(event){
  event.preventDefault();
  console.log(name);
}
|
这样任何写在函数中的代码都会被执行
React 生命周期函数
所有的React类组件必须包含render方法,返回一些元素并插入到DOM中。其中ReactDOM.render渲染一个纯HTML元素,目前我们使用id为root的<div>元素作为渲染入口。
 1
 2
 3
 4
 5
 6
 7
 8
 9
10
11
12
|
class sampleComponent extends React.Component{
  render(){
    return (
    	<h1>Hello World!</h1>
    );
  }
}

ReactDOM.render(
	<sampleComponent />,
  document.getElementById('root')
)
|
根节点
1
2
3
|
<div id='root'>
	<h1>Hello World</h1>
</div>
|
尽管我们无法看到浏览器渲染组件的全部过程,但是在React组件被渲染前后,我们可以调用特定的函数来实现一些操作。
这些特定的函数就是React定义好的生命周期函数
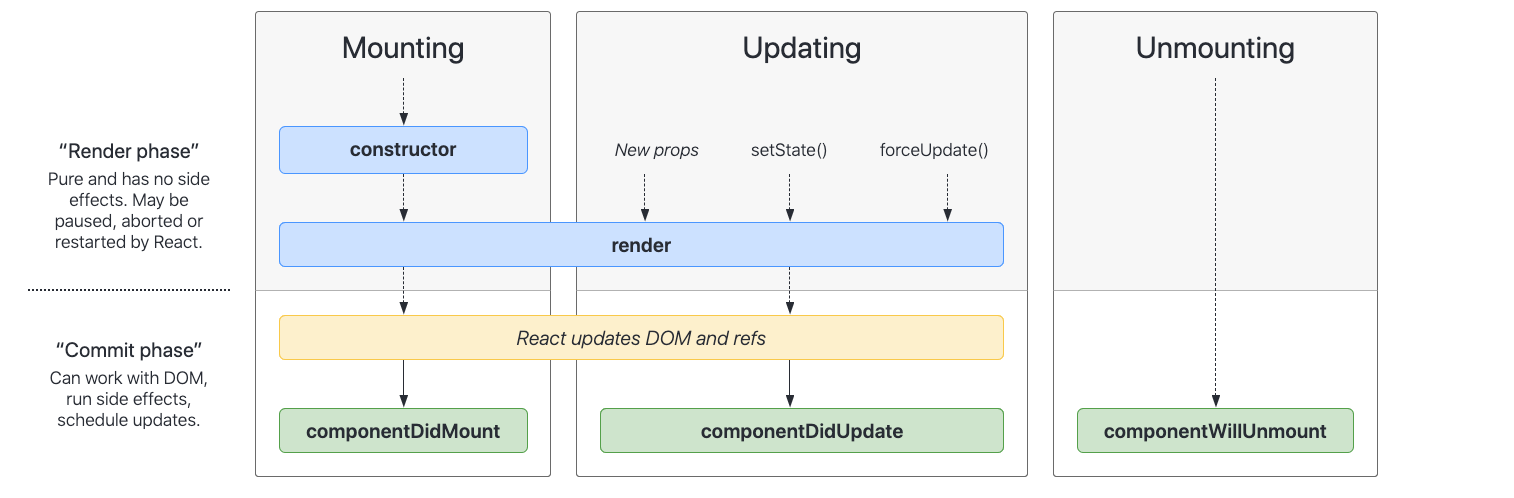
当组件第一次渲染到DOM,它会执行constructor方法,这个阶段浏览器端什么也不发生。
之后浏览器运行render方法,将JSX插入到DOM中,render完成会立刻运行componentDidMount函数。
当你调用setState,state发生变化之后render方法会被再次调用,render完成会立刻运行componentDidUpdate函数。
componentWillUnmount方法会在组件元素被DOM移除之前调用。
constructor 方法
这个方法在React初始化组件时候运行,它广泛用于state初始化:
1
2
3
4
5
6
7
8
|
class sampleComponent extends React.Component {
  constructor(props){
    super(props);
    this.state = {
      number: 0
    }
  }
}
|
super 方法调用父类的constructor,这样我们才能调用this
 1
 2
 3
 4
 5
 6
 7
 8
 9
10
|
class sampleComponent extends React.Component {
  constructor(props){
    // this will cause error
    // 'this' is not allowed before 'super()'. (no-this-before-super)eslint
    this.state = {
      number: 0
    }
    super(props);
  }
}
|
props被传递到super函数中,这样才能正确的调用this.props,如果constructor 中完全使用不到props,你可以忽略它。
你可能注意到了,我们之前初始化state并没有用到constructor:
1
2
3
4
5
|
class sampleComponent extends React.Component {
	state = {
		number: 0
	}
}
|
两种声明都是合法的,只不过constructor的方式显的更加正式,所以在类组件中被广泛使用。
render 函数
render函数我们已经使用过很多次了,它用于创建实际的JSX元素。在返回JSX之前,我们可以使用正常的JavaScript语法来获取值,并把它嵌入到JSX当中:
1
2
3
4
5
6
|
render(){
  const {name, role} = this.state;
  return (
  	<div>My name is {name} and I'm a {role}</div>
  )
}
|
componentDidMount 方法
componentDidMount方法最常被用到的地方是从后端API服务加载数据。因为它在渲染结束后被调用,能够确保你接下的操作被有效的执行。比如当你从后端抓取数据,想要通过setState来赋值给初始化好的变量;如果这时候数据已经获取到而渲染还没完成,没有初始的变量会导致React报错。所以经常要这么运用:
 1
 2
 3
 4
 5
 6
 7
 8
 9
10
11
|
class sampleComponent extends React.Component {
  componentDidMount(){
    this.fetchData().then(response => {
      this.setState({data: response.data});
    });
  }

  fetchData = () => {
    // do a fetch here and return something
  }
}
|
但是componentDidMount也有局限,它只能在一个组件的生命周期当中运行一次。
componentDidUpdate 方法
由于componentDidMount方法的局限性,它不能用于根据状态变化来获取数据。这时候就要用到componentDidUpdate,一个简单的例子:
 1
 2
 3
 4
 5
 6
 7
 8
 9
10
11
12
13
14
15
16
17
18
19
20
21
22
23
24
25
26
27
28
29
30
31
32
33
34
35
36
37
|
class SampleDidUpdate extends React.Component {
  constructor(props) {
    super(props);
    this.state = { number: 0 };
  }

  incrementState = () => {
    const { number } = this.state;
    this.setState({ number: number + 1 });
  };

  decrementState = () => {
      const { number } = this.state;
      this.setState({ number: number - 1 });
    };

  componentDidMount() {
    const { number } = this.state;
    console.log(`The current number from didMount is ${number}`);
  }

  componentDidUpdate() {
    const { number } = this.state;
    console.log(`The current number from didUpdate is ${number}`);
  }

  render() {
    const { number } = this.state;
    return (
      <>
      <div> The current number is {number}</div>
      <button onClick={this.incrementState}>Add number</button>
      <button onClick={this.decrementState}>Subtract number</button>
      </>
    );
  }
}
|
在线案例demo
componentWillUnmount 方法
这个方法在组件被DOM移除之前调用。它常被用于清除组件残留的内容。
 1
 2
 3
 4
 5
 6
 7
 8
 9
10
11
12
13
14
15
16
17
18
19
20
21
22
23
24
25
26
27
28
29
30
31
32
33
34
35
36
37
38
39
|
class ParentComponent extends React.Component {
  constructor(props) {
    super(props);
    this.state = { number: 0 };
  }

  switchState = () => {
    const { number } = this.state;
    this.setState({ number: number === 0 ? 1 : 0 });
  };

  render() {
    const { number } = this.state;
    let component = number ? <ChildComponentOne /> : <ChildComponentTwo />;
    return (
    <>
      {component}
      <button onClick={this.switchState}>Switch</button>
    </> );
  }
}

class ChildComponentOne extends React.Component {
  componentWillUnmount() {
    console.log("Component One will be removed");
  }
  render() {
    return <div>Component One</div>;
  }

}

class ChildComponentTwo extends React.Component {
  componentWillUnmount() {
    console.log("Component Two will be removed");
  }

  render() { return <div>Component Two</div>; }
}
|
这段代码中两个子组件分别渲染一段文本,并在componentWillUnmount方法中向终端打印信息。父组件根据状态渲染其中它们中的任意一个。
当你点击Switch按钮,将被移除的组件会打印信息到console,然后被新的组件替代。
该方法的最佳使用场景是关闭组件监听订阅的额外服务。
组件添加CSS
目前有四种不同的方法来将CSS添加到React组件当中,我们来看看它们具体怎么实现以及哪种适合你。
行内样式(inline styling)
虽然我们使用JSX代替了传统的HTML,但是并不代表我们不能使用CSS的行内样式。唯一不同之处在于,在JSX中行内样式必须写成对象而不是字符串。
1
2
3
4
5
|
function App() {
  return {
    <h1 style={{ color: "red" }}>Hello World</h1>
  }
}
|
上面代码最外面的大括号告诉JSX解释器它之中的内容是JavaScript代码,里面的大括号用于初始化JavaScript对象。
样式参数名如果多于两个单词需要写成驼峰命名,而不是传统的短斜线分割,比如text-align参数在JSX中必须写成 textAlign
1
2
3
4
5
|
function App(){
  return (
  	<h1 style={{ textAlign: "center" }}>Hello World</h1>
  )
}
|
由于样式在这里成了一个对象,我们可以将多个样式参数定义到变量中,方便重用:
 1
 2
 3
 4
 5
 6
 7
 8
 9
10
|
const pStyle = {
  fontSize: '16px',
  color: 'blue'
}

export default function App() {
  return (
  	<p style={pStyle}>The weather is sunny today.</p>
  )
}
|
如果你在将来需要扩展这个段落样式,可以使用对象展开操作符,然后添加额外的样式参数:
 1
 2
 3
 4
 5
 6
 7
 8
 9
10
11
12
13
14
15
|
const pStyle = {
  fontSize: '16px',
  color: 'blue'
};

export default function App() {
  return (
    <>
  	<p style={pStyle}>The weather is sunny today.</p>
    <p style={{ ...pStyle, color: "green", textAlign: "right"}}>
    	When you go to work, bring your umbrella with you!
    </p>
    </>
  )
}
|
行内样式是在JS中添加CSS的最简单的方法,其中一个有点就是你能够书写与组件相关的样式;使用对象的方式可以根据不同的需求方便的扩展额外的CSS参数。
但是对于大型复杂的项目,动则上百个组件需要管理,这种方法就显得有点难受了。
同时这种行内样式也不能使用伪类,这意味着:hover :focus :active :visited没法用;你也没法指定媒体响应式。
CSS 样式表(stylesheets)
当我们使用Create React App 创建项目,它为我们自动配置并使用webpack处理assets。这样你就能像导入JavaScript文件那样导入.css文件。在项目中创建一个css文件:
1
2
3
4
5
|
/* style.css */
.paragraph-text {
  font-size: 16px;
  color: 'blue';
}
|
然后你就可以导入这个文件并在JSX元素中通过类名使用这个样式
 1
 2
 3
 4
 5
 6
 7
 8
 9
10
11
12
|
import React, { Component } from 'react';
import './style.css';

function App(){
  return (
  	<>
    <p className="paragraph-text">
    	The weather is sunny today.
    </p>
    </>
  )
}
|
这样你的样式就可以与JavaScript文件分离,你可以像以往一样写CSS。
你甚至可以使用CSS框架比如 Bootstrap、Tailwindcss ,需要做的就是在根组件中导入相应的CSS文件。
这种方法能够让你使用所有的CSS特性,包括伪类、媒体查询。缺点是没法将样式本地化到组件。同时所有的CSS选择器都有相同的全局作用域,这就意味着某个选择器会有不必要的副作用并且破坏你程序中的其他元素。
与内联样式拥有同样的问题,表单样式也存在在大型项目中管理以及升级的不便。
CSS Modules
CSS module是一个CSS文件,它包含所有的CSS类以及默认将命名空间做了本地化。每一个React组件都会有一个自己的CSS文件,你需要将需要用到的文件导入到对应的组件。
为了让React识别你的CSS modules,你需要使用[name].module.css来规范命名文件。
1
2
3
4
5
6
7
8
9
|
/* App.module.css */
.BlueParagraph {
  color: blue;
  text-align: left;
}
.GreenParagraph {
  color: green;
  text-align: right;
}
|
导入到组件文件当中
 1
 2
 3
 4
 5
 6
 7
 8
 9
10
11
|
import React from "react";
import styles from "./App.module.css";

function App() {
  return (
  	<>
    	<p className={styles.BlueParagraph}>The weather is sunny today.</p>
      <p className={styles.GreenParagraph}>Still, don't forget to bring your umbrella!</p>
    </>
  )
}
|
当你构建项目,webpack会自动查找.module.css后缀的CSS文件,它会收集这些类名并将它们映射到新的本地命名空间中。这确保了你的CSS语法局部有效。
这样做的另外一个优点就是你可以在新的样式类中嵌入其他类,方便重用样式:
 1
 2
 3
 4
 5
 6
 7
 8
 9
10
11
12
13
14
15
|
/* App.module.css */
.MediumParagraph {
  font-size: 20px;
}

.BlueParagraph {
  composes: MediumParagraph;
  color: blue;
  text-align: left;
}
.GreenParagraph {
  composes: MediumParagraph;
  color: green;
  text-align: right;
}
|
最后,如果你想要写正常的全局类,可以在你的样式类前面使用:global选择器
1
2
3
4
|
:global .HeaderParagraph {
  font-size: 30px;
  text-transform: uppercase;
}
|
这样就可以在JavaScript文件直接使用样式类了:
1
|
<p className="HeaderParagraph">Weather Forecast</p>
|
Styled components
styled components 是为React和React Native设计的库,它结合了CSS in JS和CSS Modules两种方式。
 1
 2
 3
 4
 5
 6
 7
 8
 9
10
11
12
13
14
|
import React from "react";
import styled from "styled-components";

// Create a Title component
// that renders an <h1> tag with some styles
const Title = styled.h1`
	font-size: 1.5em;
	text-align: center;
	color: palevioletred;
`;

function App() {
  return <Title>Hello World!</Title>
}
|
但你这么写样式,实际创建了一个带有自定义样式的React 组件。这种奇怪语法结构的实现是使用JavaScript标签模板实现的。
更多信息可以查看官方文档, 了解它解决的问题以及更多例子。
小结
如果是实验性质或者比较小的项目,CSS 样式表的方式就能满足要求,毕竟这个跟我们日常写CSS最接近。如果是处理复杂的大型项目,
为了日后的可扩展性,可以考虑CSS Modules或者Styled Components这两种方式。
